Creating an Email Authentication using Supabase in React
Using Supabase Database to create an email register and login authentication in React

🚀Web Developer and Web3 enthusiastic | ✍️Technical Author @LogRocket @aviyelHQ | 🧑💻Contributor @forem | 📖300K+ Readers | 🎧Love old Hindi music
Originally published at surajondev.com
Introduction
Welcome to the latest part of the Authentication series. Previously, we have discussed "How JSON web token works in NodeJS for Authentication with a Project" and "How to use Crypto Wallet for Authentication in ReactJS". In this series, we are discussing different ways and tools to create an authentication system for your web application. You can follow me on Twitter(@surajondev) to get notified of future posts earlier.
Supabase is an open-source alternative to firebase. It provides you Postgres database, Authentication, instant APIs, Edge Functions, Realtime subscriptions, and Storage in one place. You do not need to set up anything locally, access all the features through the web-based dashboard for managing features in your application.
Today, we are going to build an authentication system that has register and login features. These features will be created with Supabase's Authentication.
So let's get started.
Setting Up Supabase
First, we need to create an account on Supabase to access their features. Go to the Supabase homepage via the supabase.com link. From the top-right navigation bar, click on Sign in. This will take you to the app.supabase.com page requesting you to Sign In with GitHub. Click on the button, and you will redirect to the GitHub login page, enter your credential and authorize the Supabase with the necessary permission.
Now, you will be redirected back to app.supabase.com. Here, we will create our project.
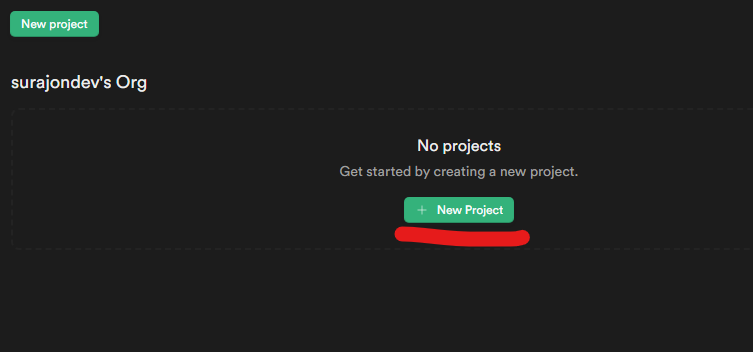
Click on + New Project to initiate the process. On the next page, you will be asked to fill out the following details:
Name: Enter the name of your project. I have gone with 'supabase-authn'.
Database Password: Enter a strong password for your project.
Region: Select the server region, which is closest to your location.
Pricing Plan: Use the free tier for now.
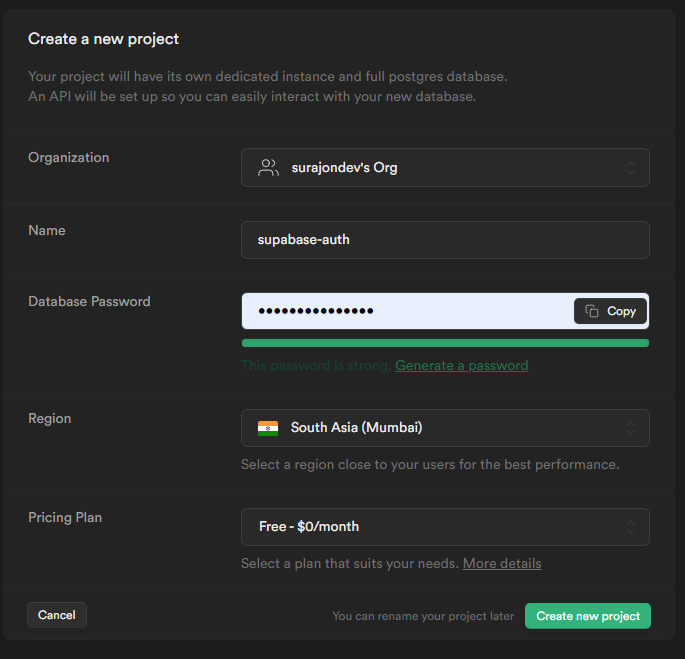
After filling the details, click on Create new project. This will takes some time(Around 1-2 minutes) to create the project.
Once the project is created, it's time to set up our React project.
Environment Setup
Let's create our project in ReactJS. Install react with the below command.
Enter the below command in the terminal: command
npx create-react-app supabase-authn
This will create the basic react application. Delete all the unnecessary files and code from the /src directory.
Dependencies
As for the dependencies of our project, we need just supabase-js library to interact with the supabase database. Install the library with the below command.
Change directory to /supabase-authn and run the below command in the terminal:
npm install @supabase/supabase-js
Now, the environment for the development of our project has been set up. Now, it's time to write some code.
Note: To run the above commands, you need nodejs pre-installed on your machine.
App.js
In the /src/App.js, we will implement the feature of Register and Login. First let's look into the working of the project.
Here is the algorithm:
- Take email, password, and username from the user.
usernameis not mandatory and unique. - If any error occurs then display the message. Otherwise, display a successful registration message.
- Users can log in to their account with a valid email and password.
- If login fails then displays an error message. Otherwise, display a successful login message.
So, let's implement the feature.
Imports
At the top, we are importing the library and CSS files.
import './App.css';
import { useState } from 'react';
import { createClient } from '@supabase/supabase-js'
Usestate hooks for storing data
We have used the useState hooks to store the data. Here are all the states with comments explaining their purpose.
  const [email, setEmail] = useState(''); // email of the user
  const [password, setPassword] = useState(''); // password of the user
  const [username, setUsername] = useState(''); // username of the user
  const [Rmsg, setRMsg] = useState(''); // Registration message
  const [Lmsg, setLMsg] = useState(''); // Login message
  const [user, setUser] = useState(''); // User object after registration / login
  const [session, setSession] = useState(''); // session object after registration / login
Return statement
As for the return, we are having both the register and login components. Here is the code for it.
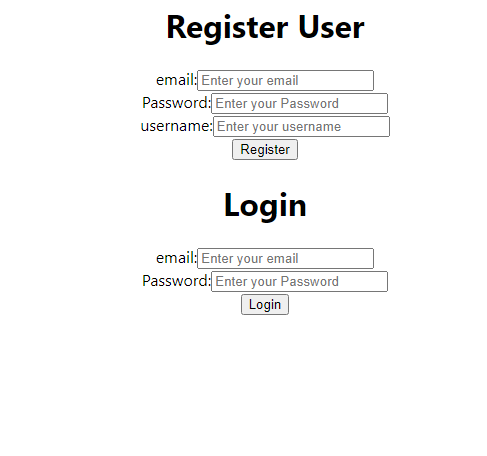
return (
    <div className="App">
      <h1>Register User</h1>
      email:<input type="email" onChange={(e) => setEmail(e.target.value)} placeholder="Enter your email" /><br/>
      Password:<input type="password" onChange={(e) => setPassword(e.target.value)} placeholder="Enter your Password" /><br/>
      username:<input type="text" onChange={(e) => setUsername(e.target.value)} placeholder="Enter your username" /><br/>
      <button onClick={Register}>Register</button><br/>
      <p>{Rmsg}</p>
      <h1>Login</h1>
      email:<input type="email" onChange={(e) => setEmail(e.target.value)} placeholder="Enter your email" /><br/>      Password:<input type="password" onChange={(e) => setPassword(e.target.value)} placeholder="Enter your Password" /><br/>
      <button onClick={Login}>Login</button><br/>
      <p>{Lmsg}</p>
    </div>
  );
This will result in the following output:
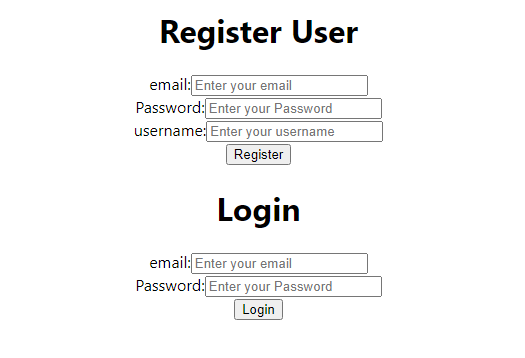
Note: There will be an error as we haven't implemented the Register and Login components
There are two functions Register and Login which will be triggered after clicking the Register and Login buttons simultaneously. Let's write code for both of them.
supabase
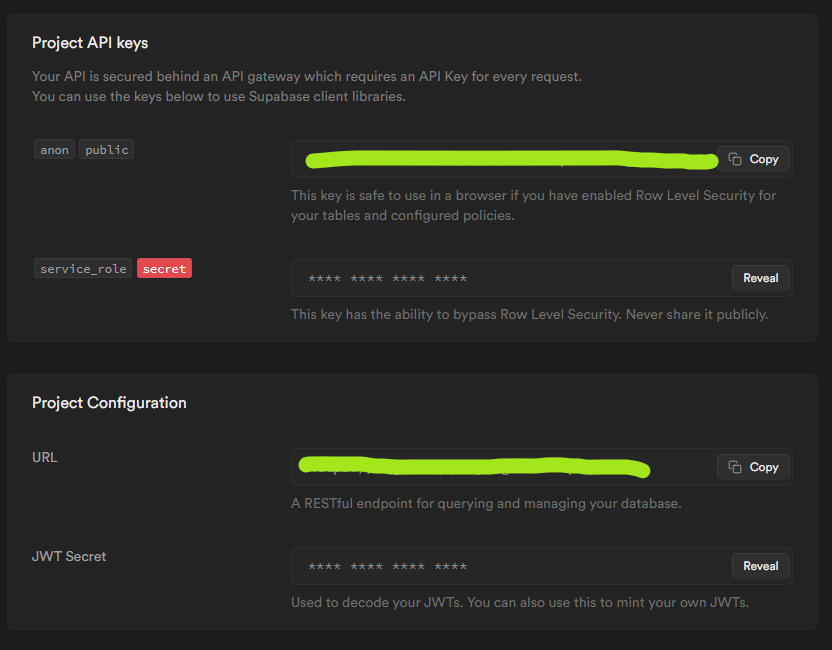
Before writing the code for the Register and Login components, we need to establish a connection with the supabase database. For this, we need two things - anon and URL.
Anon is a JWT token that acts as an API key while making calls to the supabase database. URL is a RESTful endpoint for querying and managing your database.
You can get both of the things from your supabase project's Home tab available at the top of the left panel after selecting the database from https://app.supabase.com/.
Now, we have both things, now it's time to add them to our React project. We will use the API key and URL as the environment variable. For that create a file .env in the root directory of the project. Add the environment variable in the below format.
REACT_APP_SUPABASE_URL="Your project's URL"
REACT_APP_SUPABASE_ANON_KEY="Your project's Anon"
Prefix the name of the environment variable with
REACT_APP_. This will load the variable directly into the browser's environment and we do not need to use the dotenv library.
Now add the below code in App.js for accessing the supabase database.
const supabaseUrl = process.env.REACT_APP_SUPABASE_URL
const supabaseAnonKey = process.env.REACT_APP_SUPABASE_ANON_KEY

const supabase = createClient(supabaseUrl, supabaseAnonKey)
We can use the supabase variable for making requests to the supabase database.
Now, let's look into the Login and Register component that will use the supabase variable.
Register
This function will be triggered when someone clicks the Register button. Let's first look into the code and then I will explain each step one by one.
const Register = async () => {
const {data, error} = await supabase.auth.signUp({
email,
password,
},
{
data: {
username
}
})
if(error){
setRMsg(error.message)
}else{
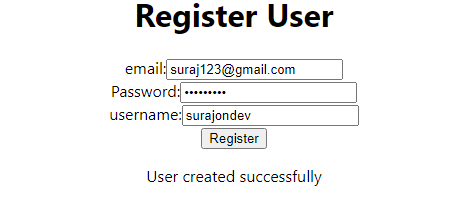
setRMsg('User created successfully')
setUser(data.user)
}
}
At the top, we are making a call to the database with the function supabase.auth.signUp(). This function is used to create a new account. It takes two variables one is for email and password, and another one is for the payload. The payload can have data that you want to send to the server along with email and password. As payload, we are sending data objects having property usernames.
The call will result in a response in an object format. We have destructured it to extract errors and data from it. We will move as per the response. If any error occurs, we will set the request message with setRMsg() to display the error message to the user. The error can be a password less than 6 characters, email is not valid, the user already exists, and others.
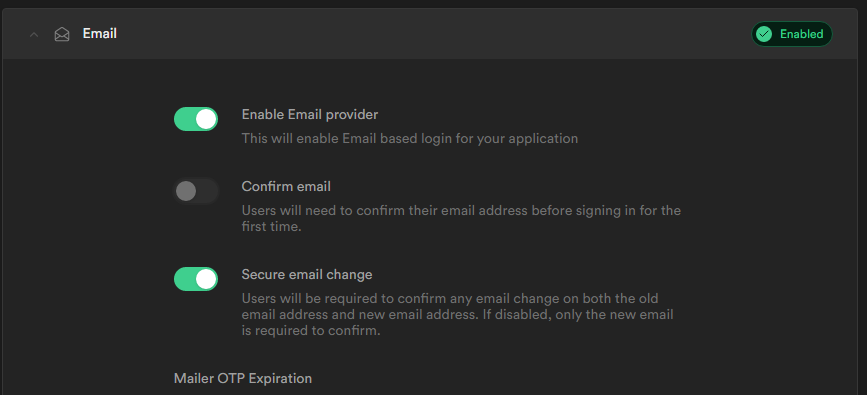
If there are no errors then we will store the user data and set the register message with "User created successfully". By default, an email confirmation is active and you need to confirm the email before logging into the account. For development purposes, you can also disable this feature by going to your project in app.supabase.com. In project, Go to Authentication -> Setting -> Auth Provider -> Email. In the email provider, disable the Confirm Email.
Login
Here is the login code of our application. As usual, first, let's look into the code and then the explanation.
const Login = async () => {
const { data, error } = await supabase.auth.signInWithPassword({
email,
password,
})
if(error){
setLMsg(error.message)
}else{
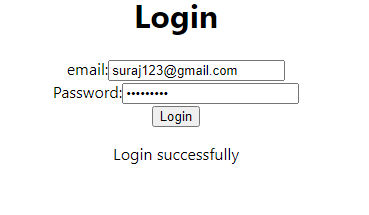
setLMsg('Login successfully')
setUser(data.user)
setSession(data.session)
console.log(data.session)
}
}
Using the supabase.auth.signInWithPassword() function, we are calling the database to sign in to the account with email and password. This will give us a response and we have restructured it to extract data and error.
If any error occurs while making calls, we will display the message to the user. The error can be email not confirmed, invalid credentials, etc.
If the login happens, we are extracting user and session information from the data. Users contain information related to the sign of the user such as provider, created at, last sign, and others.
Here is an example of the user object.
{
  "id": "8cb69bb7-d795-4b27-96f5-de9c946d9d4a",
  "aud": "authenticated",
  "role": "authenticated",
  "email": "suraj1@gmail.com",
  "email_confirmed_at": "2022-09-18T16:54:26.17774297Z"
}
The session data contain information related to the created session. It includes data such as JWT token, token bearer, expire_in, and refresh_token. JWT tokens can be used to grant access to protected routes. You can learn more about it through my previous article, How JSON web token works in NodeJS for Authentication with a Project .
Here is an example of the session object.
{
  "access_token": "eyJhbGciOiJIUzI1NiIsInR5cCI6IkpXVCJ9.eyJhdWQiOiJhd…Y5In0.oOnB3Ja-w-tnyEBkvqhsi45XdSGl2vf9F45wklsatw4",
  "token_type": "bearer",
  "expires_in": 3600,
  "refresh_token": "RkKQetdqQB1R-dkbuLyBdA"
}
Demo
After the successful compilation, you will be able to see the below screen on the localhost:3000.
If you entered the valid details in the register input then an account will be created at the supabase server.
You will be able to see the user in the Authentication tab of your project at app.supabase.com.
Now, if you try to log in with the same credentials(Email and Password), you will be able to see the "Login successfully" message.
Connect With Me
Conclusion
You can do a lot of things with the Supabase database such as storage, database, and function. You can also implement a variety of authentication such as Magic Link, Phone, and OAuth.
I hope, you have to understand the authentication using the Supabase database. Thanks for reading the blog post.


